In this blog, I combine some things I learned to make at my fourth Fig Cooking School class, Spice Market: Persia, with some things I learned to make at my second Weekend Kitchen cooking class, Eat the Colors of the Rainbow. I also reflect a little on my philosophy about cooking classes in general, and about the two different approaches of Fig and Weekend Kitchen.
Spice Market; Persia
On Saturday the 26th, I took the Spice Market: Persia class at the Fig Cooking School’s new facility in Milford, where I learned to make Kebab-E Kubideh (lamb kebab) with Mast-O-Khiar (yogurt cucumber sauce), and the famous, special occasion Javaher Polow (jeweled rice) with Khoresh-E-Fesenjan (chicken-pomegranate stew). This was the most advanced class I have taken at Fig. Many of the students had taken other Fig classes. Heidi Lang, the chef teacher, calls it her AP course. It lasted almost five hours.
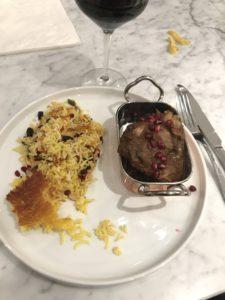
The Plated Chicken-Pomegranate Stew:
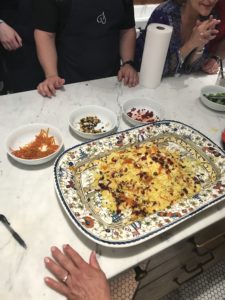
The Jeweled Rice in All Its Glory:
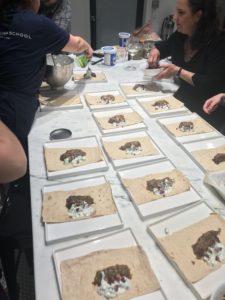
The Lamb Kebabs and Yogurt Cucumber Sauce Being Assembled:
Eat the Colors of the Rainbow
On Friday the 18th, I took the Eat the Colors of the Rainbow class at Weekend Kitchen, where I learned to make: Red – Roasted Beet Hummus with Homemade Pita; Orange – Sweet Potato Stackers with Coconut and Pecans; Yellow – Chicken and Elote Salad; Green – Spinach and Green Onion Basmati Rice; Violet – Thai Sesame Red Cabbage Salad; and Blue – Blueberry Crumble.
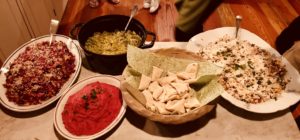
The Thai Salad, Roasted Beet Hummus, Green Rice, Pita, and Chicken and Eliote Salad:
The Sweet Potato Stackers:

In this blog, I combine the homemade pita from Weekend Kitchen with the lamb kebabs and yogurt sauce from Fig, and the beet hummus (jazzed up with some Jerusalem inspired garnishes) and homemade pita from Weekend Kitchen with the yogurt cucumber sauce from Fig. I have also reprised the Thai Salad and the Green Rice from the Eat the Rainbow class. I’ll do a separate blog on those once I’ve cooked the whole rainbow of dishes from that class. And I am looking forward to reprising the Pomegranate Chicken and Jeweled Rice from the Spice Market: Persia class once I finish assembling all of the ingredients, and will blog on those once I cook them.
Lamb Kebabs with Yogurt Cucumber Sauce and Homemade Pita
I made this for dinner last night:

Making the Pita
Since the pita takes the longest to make, I started with that. The ingredients for the pita are pretty simple: just 2.5 tsp of fast rising yeast (activated with 1 tsp sugar in 1/2 cup warm water), 3 cups flour, 1 and 1/4 tsp salt (I used an inexpensive sea salt – I explain why below), and 1 cup warm water. You put 2.5 tsp of quick rising yeast and 1 tsp sugar in 1/2 cup warm water and let sit 10 min. Then add the bloomed yeast to 3 cups flour and 1 and 1/4 tsp salt in a standing mixer with a hook attachment. With mixer running on low, slowly add 1 cup warm water and mix until it becomes a dough, then continue to knead the dough on low for 7 minutes. [You could do this by hand if you don’t have a standing mixer with a hook attachment, which Chef Jenn at Weekend Kitchen had to do because the standing mixer was broken or missing, I forget which…people have hand kneaded dough for thousands of years]. Take the dough off the hook and form into a large ball and transfer to a large bowl coated with sunflower oil (or other vegetable oil, but not olive oil). Turn dough ball over to cover all sides with oil, then cover the bowl with a towel and set in a draft-free, warm spot for two hours till doubled. At the 1 hour mark, put a pizza steel (or an inverted roasting pan) on the lowest rack of the oven and pre heat for 1 hour at 500F. Yes, you read that right, 500F. Once doubled, roll out the dough in a rope, and pinch off 6 pieces. If you want smaller pitas, you could punch off 10-12 pieces. Roll each piece into a ball, place on floured surface, cover with towel and let sit for 10 minutes. Then roll out each piece into a circle till dough is 1/4 inch thick. Mine made circles of about 7 inches in diameter:
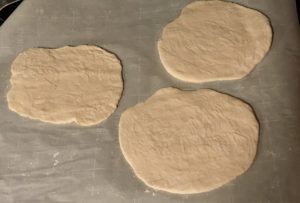
Then cook the pita on the pizza steel (or inverted roasting pan) for 4 minutes, till puffed up. Flip and cook on the other side for 2 more minutes. I was able to cook my 6 pitas in two batches of 3. Here are three of the finished pitas, things of beauty if I do say so myself:

While the pita was cooking, I made the yogurt cucumber sauce and the lamb kebabs.
Making the Kebabs
Here is the Mise En Place (assembled ingredients) for the kebabs:
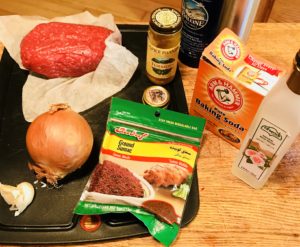
These include, for the half recipe I made: 1 lb of high quality ground lamb (I had Walt’s grind me some fresh from a leg of lamb – $12.99 for a pound, but this will be three meals for me, so what the heck), 1 tsp sea salt (I use an inexpensive sea salt for cooking, rather than kosher salt, because the sea salt involves less artificial processing than kosher salt, or especially, than iodized salt), 1 tsp fresh ground black pepper, 1/4 tsp saffron dissolved in 1 T Rosewater, 1/8 tsp turmeric, 1 T sumac powder, 1/4 tsp baking soda, 1 chopped medium yellow onion, 2 cloves minced garlic, and (not shown) 1/8 cup unsalted butter and 1/2 tsp lime juice to garnish.
You combine all of the ingredients except the butter and lime juice in a large bowl and knead for 7 minutes with your hands (I volunteered to do this task at the Fig class, bringing new meaning to hands-on). Then let sit for at least 30 minutes.
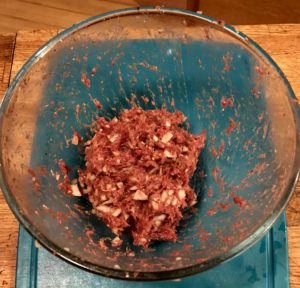
Then form into fat sausages and bake on a parchment paper-lined lined baking pan for 15 minutes at 400F till they begin to brown on the outside, but are still slightly red inside.
Making the Yogurt Cucumber Sauce
Here’s the Mise for the yogurt cucumber sauce (don’t you love the look of fresh herbs?);
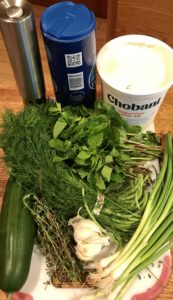
The ingredients include, for the half recipe I made: 1 English cucumber, 1 and 1/2 cups whole milk Greek yogurt, 1/4 cup chopped scallions, 1 T chopped fresh mint, 1 T chopped fresh dill, 1 T chopped fresh thyme, 2 cloves minced garlic, 1/2 tsp sea salt, 1/4 tsp fresh ground black pepper, and (not shown) 1/4 tsp dry mint and 1 T raisins to garnish. Can also garnish with edible rose petals if you have them. I didn’t and couldn’t find them in Old Saybrook yesterday, even at Fromage.
To make the yogurt cucumber sauce, you first peel and seed the cucumber, like this:
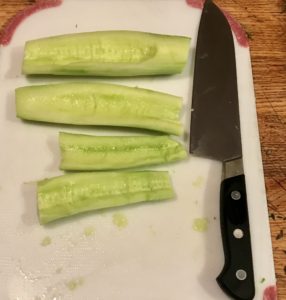
I use a teaspoon to scrape out the seeds. These are then chopped and mixed with all of the other ingredients listed above, except the garnishes, and then chilled in the fridge for at least 10 minutes.
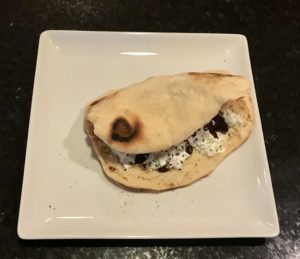
Plating
Melt some butter and add some lime juice to it (1/8 cup of butter and 1/2 tsp lime juice for my 1/2 recipe). Slice open a pita and put a kebab and some yogurt sauce on one side. Garnish the kebab with the warm butter and lime juice, and some sumac powder. Garnish the yogurt cucumber sauce with some dry mint and raisins (and edible rose petals if you can find them). Fold over and enjoy!
The Yen and Yang of It: Roasted Beet Hummus, Yogurt Cucumber Sauce and Homemade Pita
For lunch today, I made a mezze of some Roasted Beet Hummus and Homemade Pita from the Weekend Kitchen class, and some of the Yogurt Cucumber Sauce from the Fig class:
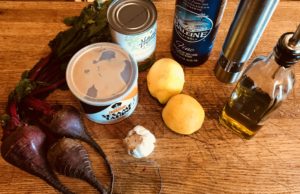
Here’s the Mise:
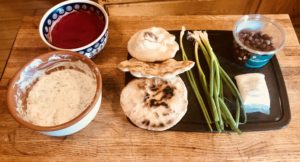
The ingredients include: the beet hummus and the cucumber sauce, both of which I had made already; my homemade pitas (I used one of them, cut into wedges); and scallions, goat cheese and hazel nuts to garnish the beet hummus. Those garnishes were inspired by the ones in a beet spread I make a lot from a recipe in the Jerusalem cookbook. Not shown: dry mint and raisins to garnish the cucumber sauce.
Making the Roasted Beet Hummus
I show the step by step for the cucumber sauce above, in the recipe for the lamb kebabs. Here’s the Mise for the beet hummus:
The ingredients include: 2 medium roasted beets (peel raw beets, coat with olive oil, wrap in foil and bake at 375F for 45 minutes, let cool a little and quarter); 1 15-0z can chickpeas, drained; zest of 2 lemons; juice of 1 lemon; sea salt and fresh ground pepper to taste; 3 cloves minced garlic; 4 heaping T tahini; and 1/2 cup EVOO.
Put beets in a food processor and process till until only small bits remain. Add remaining ingredients except the olive oil, and blend until smooth. Then drizzle in the olive oil with the food processor running. Taste and adjust seasonings, adding more salt, lemon juice or olive oil as needed. If it’s too thick, add a bit of water.
Making the Garnishes
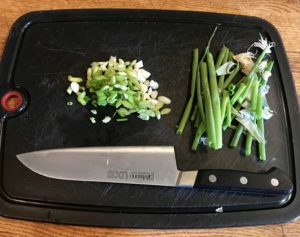
Trim and slice the green onion:
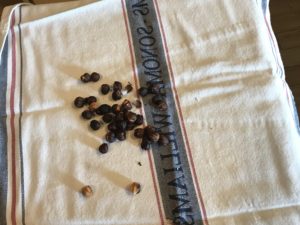
Toast the hazel nuts at 350F for 5-10 minutes, being careful not to let them burn:

Place the hazel nuts on a towel while still warm:
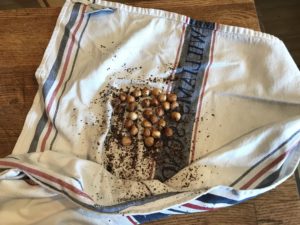
Fold up the towel and rub briskly between your hands:

The skins of the hazel nuts will rub off:
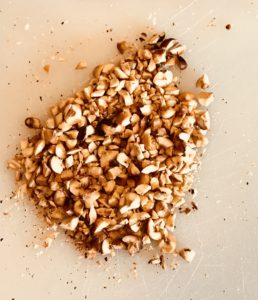
Then chop the skinned, roasted hazelnuts:
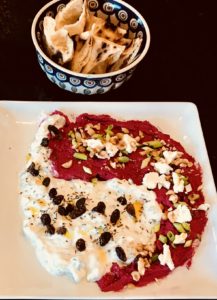
Plating
I plated the beet hummus and the cucumber sauce in a yen-yang pattern, then garnished the beet hummus with chopped scallions, chopped hazelnuts and dabs of a plain, local goat cheese that I bought at Fromage when I was looking for rose petals; and garnished the cucumber sauce with dry mint and raisins. Drizzled a little EVOO over both. Seasoned with a little sea salt and fresh ground pepper. Served with one of my homemade pitas, cut into wedges. It was awesome.
A Little Philosophy
I try to reprise all of the dishes from a cooking class in the days immediately following the class, while what I’ve learned is still “in my hands.” Both Fig and Weekend Kitchen are hands-on cooking classes, versus demonstration cooking classes. I much prefer the hands-on approach, because I think it enables the transfer of tacit knowledge from the chef teacher to the student better than just watching a demonstration by the chef teacher. We all know more than what we know consciously that we know. A recipe is a transcription of conscious knowledge. A demonstration transmits (through gesture and context) some tacit knowledge beyond what’s in the recipe and beyond what the chef teacher is saying, but for the exchange of tacit knowledge, nothing beats the co-experience of the hands-on approach, where students actually prepare the food side-by-side with the chef teacher. This knowledge is tacit on the receiving end, as well as the sending end. You only consciously know a portion of what you have learned in the class; the rest is “in your hands.” To set it permanently, you need to reprise the dishes right away, before the tacit knowledge dissipates. If you think this all some kind of crystal rock mumbo jumbo, read some of the work of the philosopher Michael Polyani, who famously said, “We know more than we can tell.” My day job is in the innovation economy, the crux of which is the exchange of tacit knowledge, so I actually know what I’m talking about. We are all like ice bergs, with our conscious knowledge the tip of the ice berg above the water, and our tacit knowledge the bigger bottom of the ice berg below the water. The trick in a cooking class (for both the chef teacher and the student) is to create opportunities for the bottoms of our ice bergs to bump into each other.
Fig School and Weekend Kitchen
I have now taken a total of seven cooking classes over the last 12 months: four at Fig, two at Weekend Kitchen, and one at the Divertimenti Cookery School in London. Fig and Weekend Kitchen take different approaches on how to present a cooking class. I like both and will be taking more classes at each.
All of the classes at Fig are taught by chef-owner Heidi Lang. The good thing about that is that you really get to know Heidi, who is just a terrific human being: warm, funny, knowledgable, engaging. Weekend Kitchen, on the other hand, is organized by Nancy Kikles-Smith, the owner of the Weekend Kitchen shop in Essex, who brings in guest chefs for each class. The advantage of that is the exposure to a variety of chefs with different specialties.
Nancy hosts the classes at her home. Heidi Lang at Fig used to teach her classes from her home in Hamden too, but has now opened a dedicated facility for the cooking school in the Devon section of Milford. Part of the charm of cooking classes is conviviality, spending an evening with an interesting group of people who share a passion for cooking and food, which is enhanced when the meal at the end of the class is taken together in a home. Nancy’s home is a beautifully restored colonial with a large teaching kitchen adjoining a large dining table where we had the meal. At the end, after we had eaten the meal we cooked and were sitting around the table, Nancy brought out her Boston Terrier puppy Farley to socialize with the class. He was the star of the night:

But Heidi has also managed to create a sense of conviviality at her new facility, which has a better set up for the actual cooking than is possible in a home kitchen. Maybe the reason that this sparklingly modern facility is still convivial is the high top table with stools where the dinner is served, which creates a happy hour vibe. Both classes are BYOB for the meal at the end. That helps with the conviviality too. For most of the classes at both schools, I was the only singleton in classes of couples and pairs of couples. But I never felt like the odd man out.
The biggest difference in the approaches of Fig and Weekend Kitchen are the number of dishes cooked. Fig focuses on three or four dishes: a starter, a main (usually with a side) and a dessert. The Spice Market: Persia class was a little different, with two mains, each with a side, one “side” the incredibly elaborate jeweled rice. We needed two mains because of the length of time required to cook the jeweled rice and the chicken. In effect, we had two meals that night, one to tide us over till the next one was ready.
The two classes I took at Weekend Kitchen each had six dishes. That is just too many dishes for each student to have hands-on experience with each. The work has to be divided up among teams. An elaborate meal gets cooked and eaten, and you walk away with recipes for a greater number of dishes, but without real hands-on engagement with all of them, and the tacit knowledge that is tapped through it. And it is difficult to quickly reprise that many dishes right after the class, so some of your “hands knowledge” inevitably dissipates. I think cooking classes are a case of Less Is More. The Fig approach is better on this aspect.
1 thought on “Fig School IV and Weekend Kitchen II”
Comments are closed.